Are you seeing an error notice on your WordPress site that says ‘The site is experiencing technical difficulties’?
When your website is down due to a significant problem with PHP code somewhere on your site, this error message appears.
We’ll teach you how to find the faulty code and solve the ‘The site is having technical difficulties’ error notice in WordPress in this post
What Is the Technical Issues Error in WordPress?
PHP is the programming language used to create your WordPress website. Any issues with such code might cause your website to crash.
A catastrophic PHP error used to result in the White Screen of Death. Instead of a blank screen, a useful feature introduced in WordPress 5.2 has enhanced fatal error prevention, displaying an error message: “The site is having technical issues.”

If you try to log in to your site, then you’ll see a slightly different message: “The site is experiencing technical difficulties. Please check your site admin email inbox for instructions.”

Alternatively, you may see the following error message: ‘This website has experienced a critical problem.’
The WordPress core, themes, and plugins all require PHP, therefore they might be the root of the problem. You could have recently copied and pasted code snippets to your website, or there could be a conflict between a plugin or theme and some custom code.
Your task will be to determine the cause of the mistake and then correct it.
So, let’s look at how to repair ‘The site is having technical issues’ in WordPress. We’ll go through two options, the first of which is the most straightforward if you get an email informing you of the problem.
Method 1: Resolving Technical Issues
Method 1: Fixing Technical Difficulties Error Using Recovery Mode
The error notice about technical issues isn’t particularly helpful. Fortunately, WordPress sends an email to your website’s admin email account with information about the mistake.
If you’re using Bluehost or a WordPress auto-installer, your admin email address will most likely be the same as your WordPress hosting account email address.
Many WordPress sites have problems sending emails, so if you didn’t receive the email, try Method 2 to address the problem.
You should receive an email with the subject line ‘Your Site is Experiencing a Technical Issue’ in your inbox. It will provide useful information regarding the mistake that occurred on your website.
For example, the email in the accompanying snapshot states that
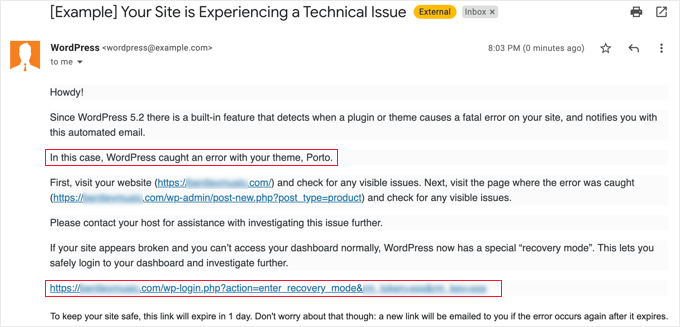
Now you just need to click on the link to WordPress recovery mode, which will take you to your WordPress admin area.
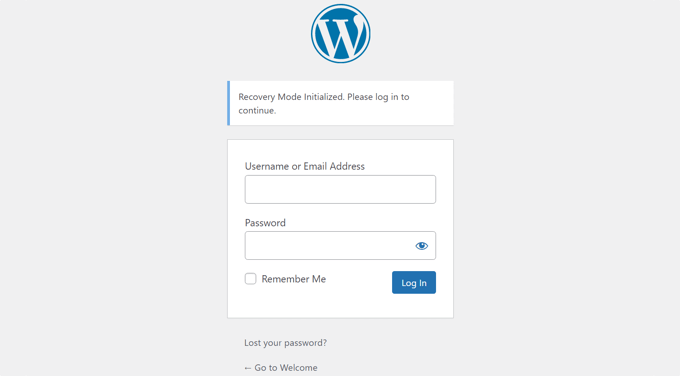
First, you’ll be asked to log in to WordPress.
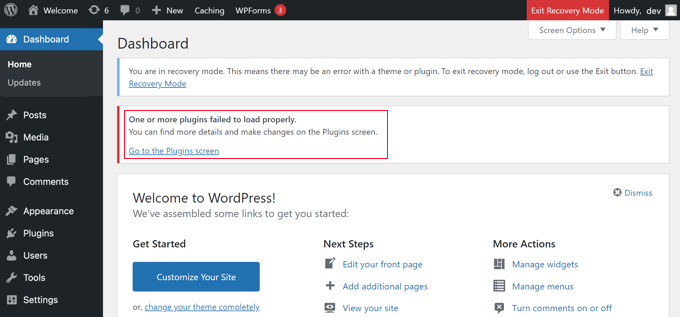
Once you are logged in, you will see a notification explaining that you are in recovery mode. You will also see a link to where you can go to fix the problem.
For instance, in the following screenshot, the message tells us that one or more plugins failed to load properly and provides a link to the plugins page.
Once you click on the link, you will see the misbehaving plugin. You will also see exactly which line of code caused the error.
You can go ahead and deactivate the plugin for now.
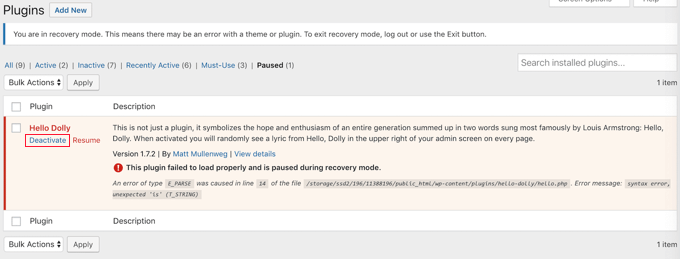
Next, you can simply look for an alternative WordPress plugin, or see if you can get support from the plugin developers. Make sure you share the description of the error with them.
Similarly, if the issue is with your theme, then you will see a link to the themes page. At the bottom of the page, you can see the theme causing the issue.

You can simply change your WordPress theme, or delete the broken theme and reinstall a fresh copy of the same theme from the official source to see if that resolves the issue.
Once you have addressed the issue, you can simply go ahead and click on the Exit Recovery Mode button at the top.

In most cases, your WordPress website will now be working normally.
However, if you are still seeing the technical difficulties error in WordPress, then you can try the troubleshooting steps in the next step.
Method 2: Fixing Technical Difficulties Error Manually
This is how you may troubleshoot and solve the technical difficulties problem in WordPress if you didn’t receive the WordPress notification email regarding the technical difficulties error.
If the mistake was triggered by a recent action you did, simply undo it to resolve the problem.
For example, if you installed a new plugin and activating it produced a technical issue, you’ll need to deactivate it. In the first step, we’ll teach you how to accomplish it.
If you are unsure, though, you may just follow the procedures below.
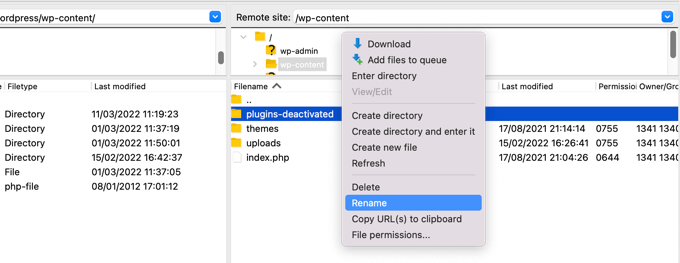
Inside the wp-content folder, you will see a folder called plugins. You need to right click this folder then select ‘Rename’ from the menu.
Next, change the name of the plugins folder to anything that you like. In our example, we’ll call it plugins-deactivated.
All of your plugins will be deactivated as a result of this, and you may check your website to see whether the technical issues warning has vanished.
If the error notice remains visible on your site, it is not the result of a plugin. Return the folder’s name to plugins and go to the next step below.
If the error notice is no longer visible, you’ll need to figure out which one was the source of the issue. To begin, rename the plugins folder back to plugins.
Now go to the Plugins > Installed Plugins page in your WordPress admin area and log in. You’ll need to reactivate each plugin one by one to figure out which one caused the problem.
Switch to Default Theme
If the issue wasn’t caused by a plugin, the next step is to see if the error is caused by your theme. You’ll need to change your existing theme with a default theme to do this.
To begin, use an FTP programme to connect to your website and navigate to the /wp-content/themes/ folder. It lists all of the themes that have been installed on your website.
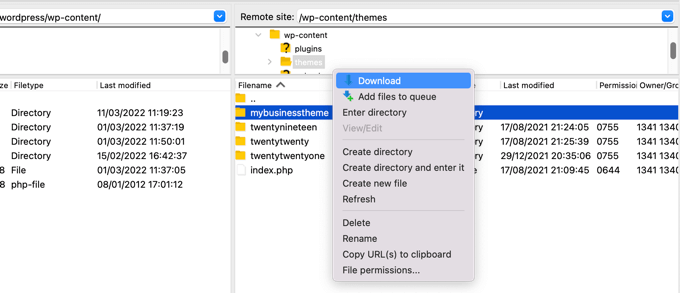
After that, right-click your existing WordPress theme and save it as a backup to your computer.
.
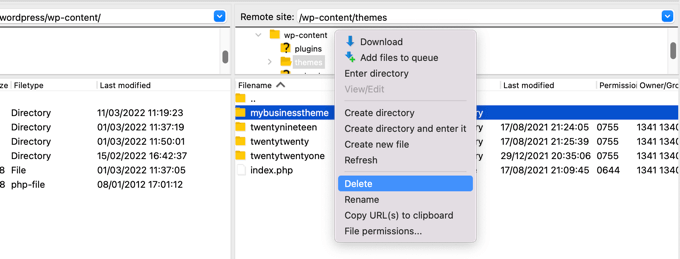
After that, you can safely delete your current theme from your website. You’ll need to right click your theme folder and select ‘Delete’.
Your FTP client will now delete the theme from your website.
If you have a default WordPress theme installed on your site, such as Twenty TwentyTwo, WordPress will use it as the default theme by default. If you don’t already have a default theme loaded, you’ll need to do it manually using FTP.
If the technical issues message no longer appears when you visit your site, the issue is most likely due to your theme.
Examining your theme’s functions.php file is another option for resolving the problem. If there are any blank spaces at the bottom of the document, you must delete them. Occasionally, this resolves the problem.
Otherwise, you might think about reinstalling your theme from scratch. See our beginner’s guide to installing for more information.
Otherwise, you might think about reinstalling your theme from scratch. See our beginner’s guide on installing a WordPress theme for more information.
WordPress should be reinstalled
If your website isn’t having technical issues as a result of a malfunctioning plugin or theme, the issue might be a damaged WordPress core file or malware on your site.
Simply visit WordPress.org and download a new copy of the software to your computer. You must unzip the file after it has been downloaded to your computer. This will generate a wordpress folder with all of the files you’ll need for the reinstall.
.
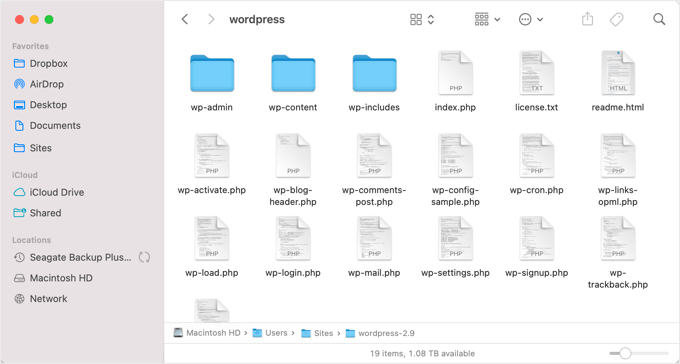
Next, you need to connect to your WordPress site using an FTP client or the file manager app in your hosting control panel.
Once connected, you need to navigate the right pane to the root folder of your website. The root folder is the one that contains the wp-admin, wp-content, wp-includes, and wp-admin folders.
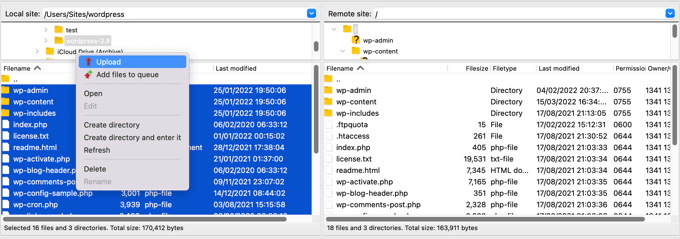
Now navigate the left pane to the fresh wordpress folder you just created. You need to select the files inside this folder and upload them to your website.
Your FTP client will ask if you want to overwrite these files or skip them. You need to select ‘Overwrite’ and check the box next to ‘Always use this action’ option.
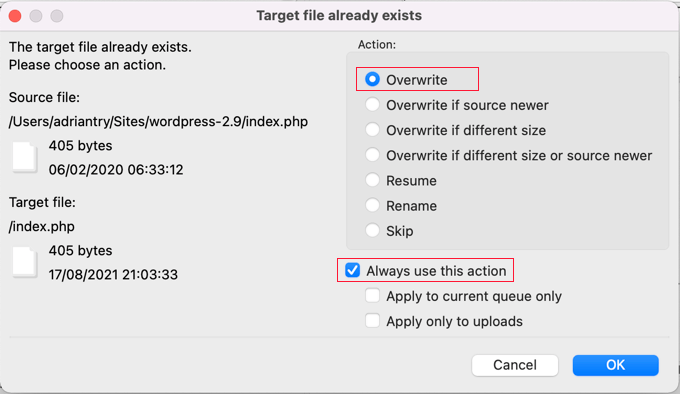
You can now proceed by pressing the OK button. All of your core WordPress files will be replaced with fresh versions from your PC using your FTP client.
After you’ve completed, go to your website to see whether the problem has been repaired.
The error notice should no longer show if the technical issue was caused by a faulty WordPress core file or malware.
Contact Your Hosting Provider
If you’ve followed all of the procedures above but are still receiving the warning “The site is experiencing technical issues,” you can seek assistance.
To discover whether there is anything your WordPress hosting provider can do, contact them. Many service providers provide outstanding technical assistance and may be able to help you with your issue.
They might be able to look at the server problem logs or restore a backup of your WordPress site, for example. They’ll tell you how they can assist you and what you need do next.
Check out our article on how to properly request and get WordPress help for the best results.
We hope you found this guide useful in learning how to fix ‘In WordPress, the site is having technical issues. To enhance your SEO ranks, you might want to discover how to speed up WordPress performance or check out our definitive WordPress SEO guide.

