Would you want to include a Google Map in the contact form on your website?
You can use geolocation to pre-fill a user’s address and show their position on a map by placing a pin. This makes filling out the form easier and faster, resulting in a higher rate of completion.
We’ll teach you how to use a map pin to embed a Google Map in contact forms in this post.
Why Embed a Google Map in Your Contact Form?
It’s likely that you included a contact form when you built your WordPress website so that people can simply contact you about your products and services.
And, if your company has a physical location, you’ve certainly included a Google Map of that place to urge visitors to come visit.
Many company owners are unaware that geolocation may be used to fill in the address box on a contact form and display the user’s location on a map. This enhances the overall user experience while also lowering the rate of form abandonment.
Knowing where your visitors are allows you to utilize geolocation targeting to deliver customized content and increase conversions.
So, without further ado, let’s have a look at
How to Incorporate a Google Map into a Contact Form
WPForms, the greatest contact form plugin for WordPress, will be used in this tutorial. With a simple drag-and-drop form builder, you can effortlessly construct any sort of form.
WPForms is a free edition that includes all of the tools you’ll need to construct a simple contact form. However, because WPForms Pro includes the Google Map extension, we’ll utilise it for this lesson.
Installing and activating the WPForms plugin is the first step. See our step-by-step guide on installing a WordPress plugin for more information.
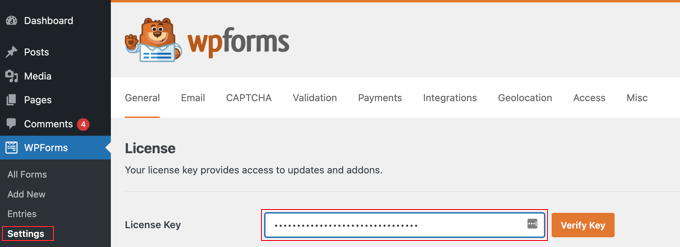
Upon activation, you need to visit the WPForms » Settings page to enter your license key. You can find this information in your WPForms account area. Make sure you click the ‘Verify Key’ button to activate your license.
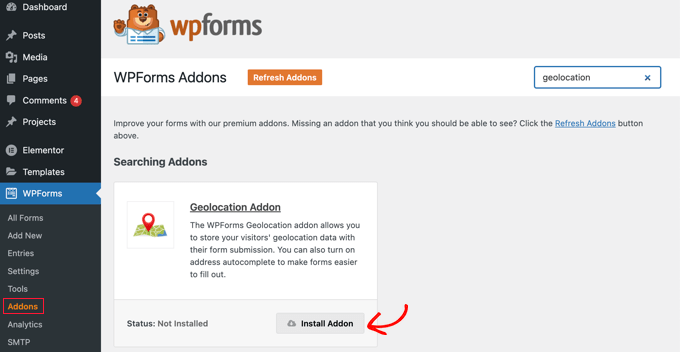
Next, you need to navigate to WPForms » Addons and find the Geolocation Addon. You can use the search option at the top of the screen, or simply scroll through the available addons.
Once you’ve found it, you should install the add-on by clicking the ‘Install Addon’ button.
Now that the Geolocation addon is activated, you will need to configure its settings. To do that, navigate to WPForms » Settings and click on the Geolocation tab.
On this page, you need to select a geolocation provider. For this article, we’ll choose the Google Places API.
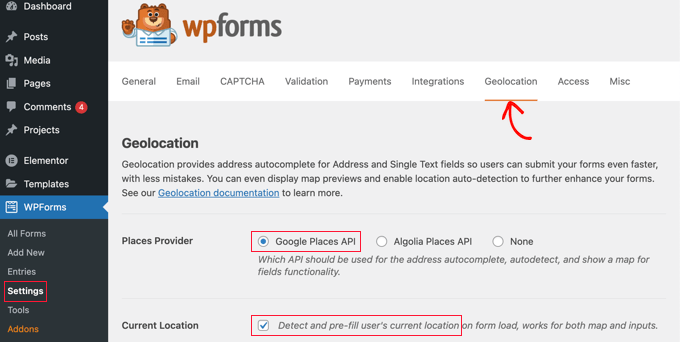
You should also click the ‘Current Location’ checkbox. This will detect and when users fill in the contact form, saving time and improving accuracy.
Next, you need to scroll down to the Google Places API settings. You will be asked to fill in your Google API key. You can get your key from Google and then paste it into the field. We’ll show you how to do that in the next section.

Generating a Google Places API Key
You can obtain an API key for Google Places by going to the website.
You’ll be asked to select your country from a drop down menu and agree to the terms of service. In some countries, you may also be offered the chance to sign up for a mailing list.
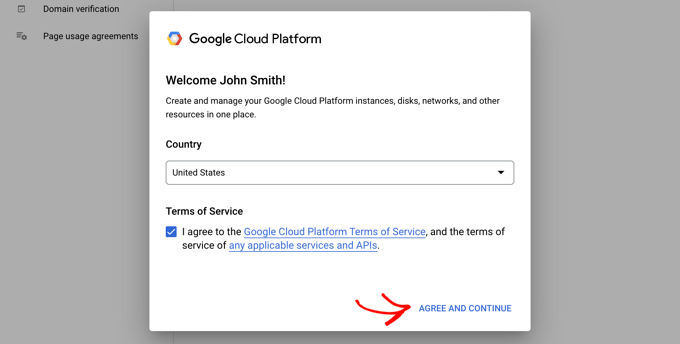
When you’re ready to move to the next step, click on ‘Agree and Continue’.
Next, you’ll need to select a project for the API key. Simply click on ‘Select a project’ and click on the project you want to use from the list.
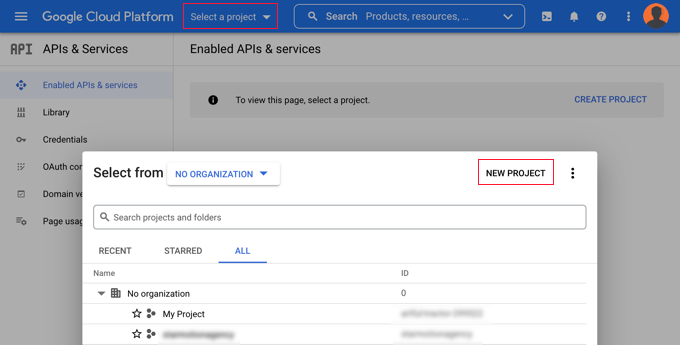
If you haven’t created a project before, or this is a new website you have not yet added to Google, then you should click ‘New Project’ to set one up.
Note: Google will require you to enable billing for that project in order to use the Google Places API. They offer the first $300 for free, which is plenty to cover a simple map embed like we’re creating in this tutorial. Smaller traffic sites won’t need to pay anything, and they’ll ask your permission to upgrade before charging any fees.
You should now be on the ‘APIs & Services’ page where you can enable the APIs needed for displaying Google Maps on your site. You’ll need to click the ‘+ Enable APIs and Services’ button at the top of the page.

This will take you to Google’s API Library where you will need to enable three different mapping APIs.
You can find them by using the search function at the top of the page or by clicking the ‘View All’ link next to the Maps section.
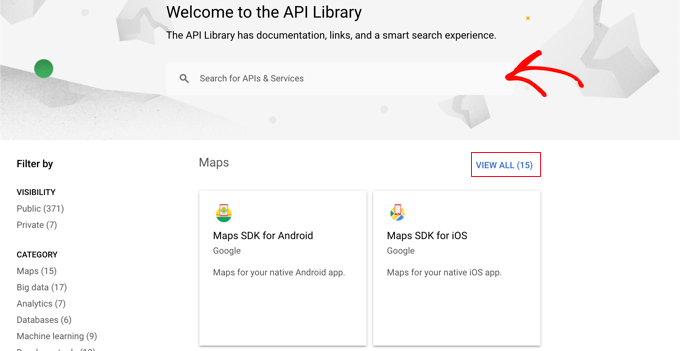
First you need to find and enable the Places API. Once you locate it, you will need to click it. On the next page, you should to click the ‘Enable’ button.
After that, you should do the same thing for the Maps JavaScript API and Geocoding API.

Now that you have enabled the three APIs, you can create an API key.
In the menu on the left, you need to navigate to APIs & Services » Credentials.
From here you will be able to click the ‘+ Create Credentials’ button at the top of the screen and then select the ‘API key’ option.

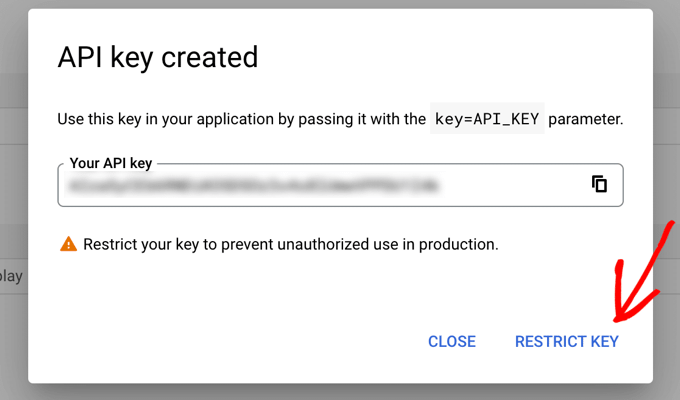
Your API key will be created and displayed on a popup window.
Later in this tutorial, you’ll need to copy that key into WPForm’s settings. For now, let’s take a look at how to place some restrictions on the use of the API key.
Restricting Your Google Places API Key
Overuse of the API key may move you out of the free plan and cost more than you expect. We recommend that you restrict the key to prevent unauthorized or unexpected use.
To do that, you need to click the ‘Restrict Key’ link at the bottom of the ‘API key created’ popup in the screenshot above.
On the next page, you can set up a number of different restrictions. The first of these is ‘Application restrictions’. In this section, you should click on the ‘HTTP referrers (web sites) option. Then the key will only be used on websites.
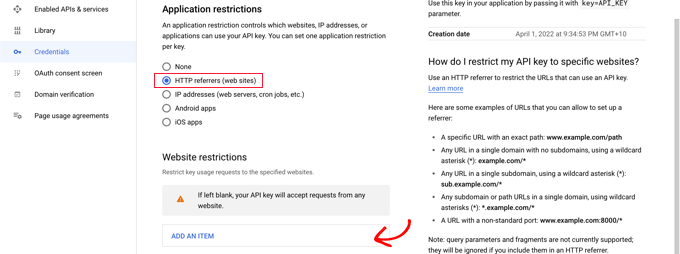
Next, you should make sure it is only used on your own website. To do that, you should scroll down to the ‘Website restrictions’ section and then click the ‘Add an Item’ button.
Now you should type your into the ‘New item’ field using the pattern *example.com/*.

If you will be using Google Maps on more than one website, then you can click the ‘Add an Item’ button and add as many domains as you need.
Now that you’ve restricted the API key to only your own websites, you can also restrict it to work with only the Google APIs that you added above.
You need to scroll down to the ‘API restrictions’ section of the page and select the ‘Restrict key’ option. This will reveal a drop down where you should check the ‘Geocaching API’, ‘Maps JavaScript API’ and ‘Places API’ boxes.
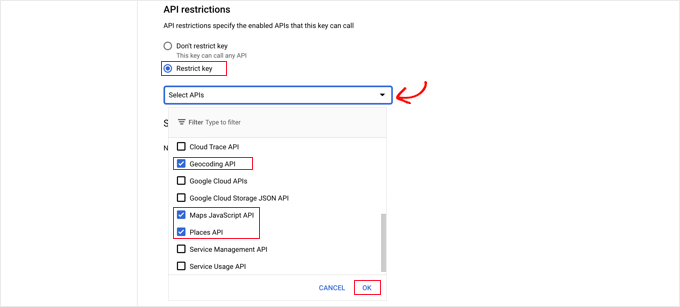
Once you’ve done that, you should click the ‘OK’ link to store your settings. Finally, make sure you click the ‘Save’ button at the bottom of the page to activate all of the restrictions you have chosen.

Note that it may take up to 5 minutes for the settings to take effect.
Adding the Google API Key to WPForms Settings
You’ll now see the API key listed with any others you have available. You should click the Copy icon so you can add the key to the WPForms Geolocation settings page.

Note that if you ever need to change any of the API’s settings or restrictions, then you can click the Edit icon on the right
Now you need to return to your website which should still be on the WPForms » Settings » Geolocation page.
Once there, paste the key into the Google Places API field in the WPForms settings. Once you’ve done that, make sure you click the ‘Save Settings’ button.

Creating a Contact Form With Embedded Google Map in WordPress
You’re ready to construct a contact form in WordPress now that you’ve configured WPForms and Google Places. Follow our tutorial on how to make a contact form in WordPress to get started.
You’ll need to add an address box once you’ve created a simple form. Either an Address block or a Single Line Text field can be used. We’ll utilise a Single Line Text field in this example.
To use the Single Line Text block, simply drag it onto the form.
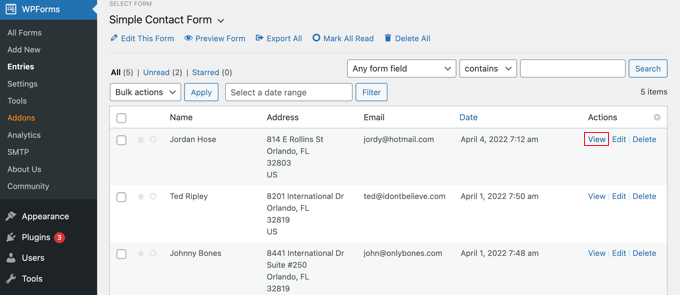
Of course, no location data will be displayed if the user does not provide permission for the form to know their location.
That’s all; your Google Map has been successfully uploaded to your contact form. WPForms may also be used to generate surveys in WordPress, as well as a payment form for accepting online payments.
We hope you found this guide on how to incorporate a Google Map in contact forms useful. You might also want to check out our expert choice of the best WordPress plugins for all business websites, or learn how to organise a giveaway or contest.

