Are you trying to figure out how to repair ‘Error 521’ with Cloudflare with WordPress?
If you’re seeing this error notice, everyone who attempts to access your website is seeing it as well. This is bad news for your conversion rates and visitor experience. It’s possible that you’ll lose your search engine ranks as a result.
We’ll teach you how to repair the 521 problem with WordPress and Cloudflare in this post.
What Causes Error 521 with WordPress and Cloudflare?
When you try to access your WordPress website and get a 521 error, it implies your browser is properly connecting to Cloudflare, but Cloudflare isn’t connecting to the server that hosts your website.
This is frequently due to your server being unavailable.
It’s also possible that your WordPress hosting server is up and running but is preventing Cloudflare. This WordPress issue usually occurs when a server misidentifies Cloudflare as a security threat. This is likely due to a configuration issue with your server or Cloudflare.
But don’t panic; we have five troubleshooting procedures that you may use to swiftly resolve this issue.
If you’re not sure what’s generating your 521 issue, start with step 1 and work your way through each section.
Make contact with your web hosting company.
Check to see whether your server is down.
Add all of Cloudflare’s IP addresses to your whitelist.
Request that your hosting provider enable port 443 for you.
Create a Cloudflare Origin Certificate and upload it.
1. Contact Your Hosting Provider
When you receive a 521 error, there are measures you may do to resolve the issue. Some of them, on the other hand, might be time-consuming and complicated.
With that in mind, contacting your WordPress hosting provider is the simplest approach to resolve a 521 issue. A professional web host should be able to explain why this problem is occurring. They could even be able to help you solve the problem.
If you’re not sure how to contact help, go to the website of your hosting provider. The next step is to search for any Contact Us or Support pages.
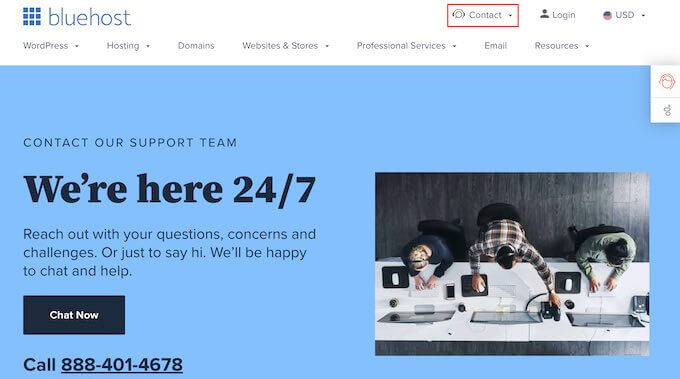
We encourage using live assistance options wherever feasible to help you resolve this issue as fast as possible. Live chat and business phone support, for example, are virtually always faster than ticketing portals or email.
If you are unable to receive immediate assistance from your hosting provider, you can attempt the procedures below.
2. Check Whether Your Server Is Offline
It’s always worth verifying whether your server is online when you get a 521 error.
If it’s still up and running, you may move on to the next phase of the troubleshooting process.
You’ll need to know your server’s IP address to perform this. On a network, this is a string of numbers that identifies a piece of hardware.
You may ping the actual server that hosts your WordPress website using this IP address. You’ll know the server is online if it responds.
If it doesn’t answer, your server is down, which is why you’re getting a 521 error.
You’ll need to get into your website’s management panel to retrieve your IP address. It’s either cPanel or a custom panel, and it’s normally provided by your hosting company.
If you’re a Bluehost customer, then you just need to log into your cPanel dashboard. You can then click on Advanced in the left sidebar.
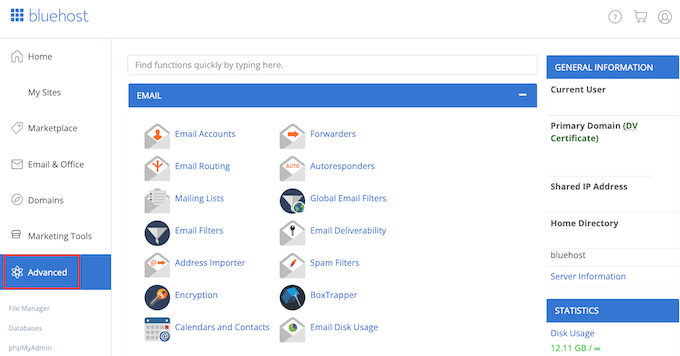
Find the General Information section on this screen.
Under ‘Shared IP address,’ Bluehost will display your server’s IP address.
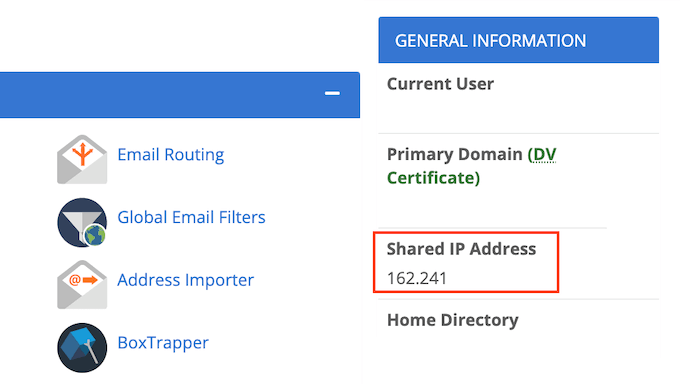
If you’re having trouble locating this IP address, try your hosting provider’s website or online documentation. Many web hosts provide comprehensive lessons on how to locate your IP address.
Go to the HTTP Header Checker tool after you have this information. This programme may be used to ping your website’s server and test if it answers.
Simply paste your IP address into the ‘URL’ area to do this test.
Then, in front of your IP address, type ‘http://’. This creates a web address from the string of integers. Consider the following scenario:
56.18.270.000
Becomes:
http://56.18.270.000
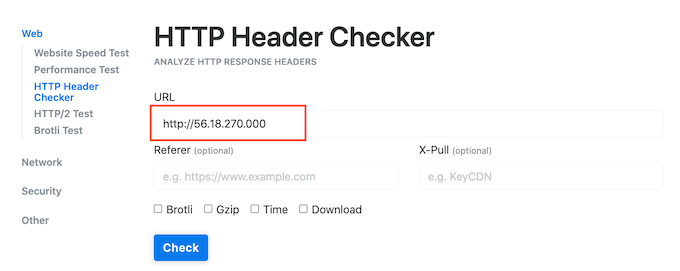
Then press the Check button. The HTTP Header Checker will now attempt to communicate with your server.
You’ll notice a message like ‘Failed to connect’ or ‘Host Not Found’ if your server is down.
This explains why the 521 error is occurring. In this scenario, you’ll need to contact your hosting company to resolve the issue.
HTTP Header Checker will display a ‘2XX’ status code if your server is online. If your server is active but temporarily diverting to a new location, you may receive a ‘3XX’ status code.
Your 521 problem isn’t caused by a server outage or downtime if your server is up and running. In such situation, you can follow the steps in this tutorial to correct the problem.
3. Whitelist All of Cloudflare’s IP Addresses
Your server may be up and running, but Cloudflare’s IP addresses are blocked. When you try to access your WordPress website, you may receive a 521 error.
The answer is to whitelist all of Cloudflare’s IP addresses. When you whitelist an IP address, you’re notifying your server that all requests from that address will be accepted.
Whitelisted IPs can be added to your website’s.htaccess file. This is a crucial configuration file that instructs the server on how to behave.
You’ll need an FTP client like FileZilla to change your.htaccess file.
If you’ve never used an FTP client before, check out our tutorial on how to use FTP. This tutorial will show you how to use an FTP client to connect to your server.
You’ll need to open your website’s root folder once you’ve connected to your server. Simply open the folder that has your website’s URL to go there.
After that, go to the ‘public html’ folder and open it.
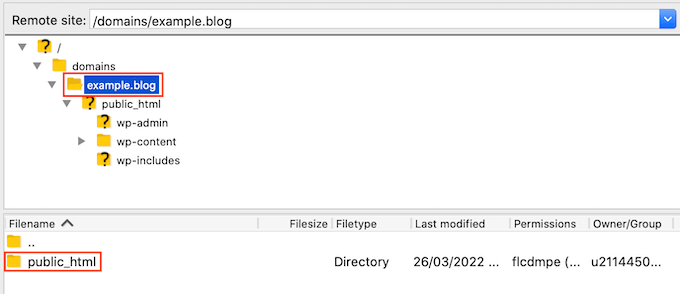
The.htaccess file for your website should now be visible.
By default, several FTP clients conceal sensitive files. You’ll need to enable the’show hidden files’ option in your FTP client if you don’t see an.htaccess file.
If you’re using FileZilla, go to the toolbar and pick Server. Then, under ‘Force revealing secret files,’ choose ‘Force showing hidden files.’
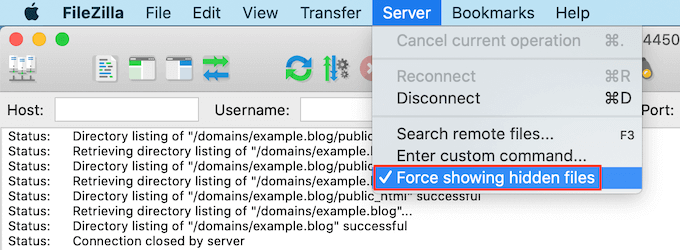
If you’re still having trouble finding.htaccess, check out our guide to finding the.htaccess file in WordPress.
Simply Control-click on the.htaccess file when you’re ready to update it.
Then choose View/Edit.
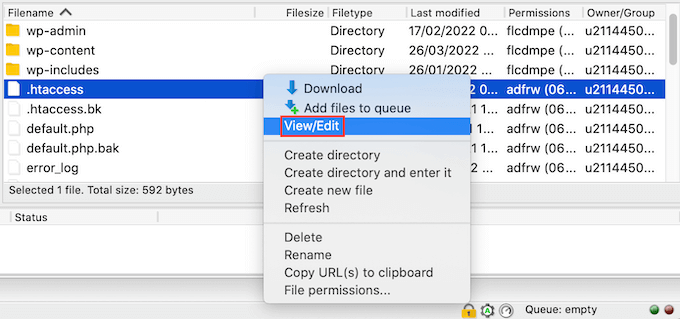
This will open .htaccess in your computer’s default text editing program.
Inside this file, find the ‘# BEGIN’ line. You’ll need to add all the Cloudflare IP addresses above this line.
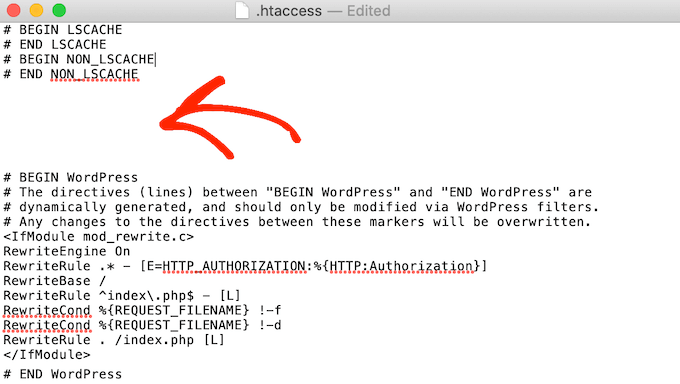
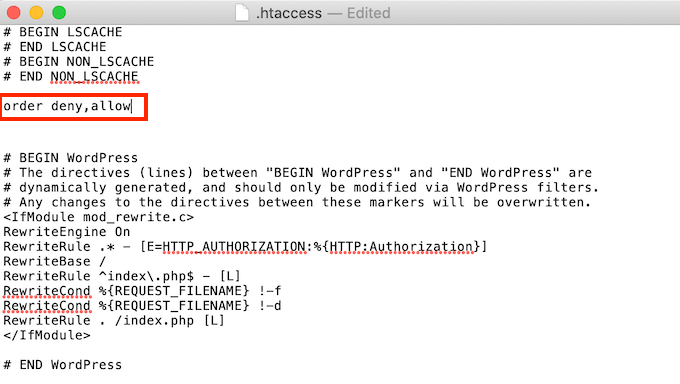
To start, type the following on a new line:
order deny,allow
Open the Cloudflare IP ranges list in a new tab.
To whitelist an IP address, put ‘allow from’ followed by the IP address, which you can either copy/paste or type. That is to say:
103.21.244.0/22
Becomes:
Allow 103.21.244.0/22 103.21.244.0/22 103.21.244.0/22 103.21.2
You’ll also need to create a new line for each IP address.
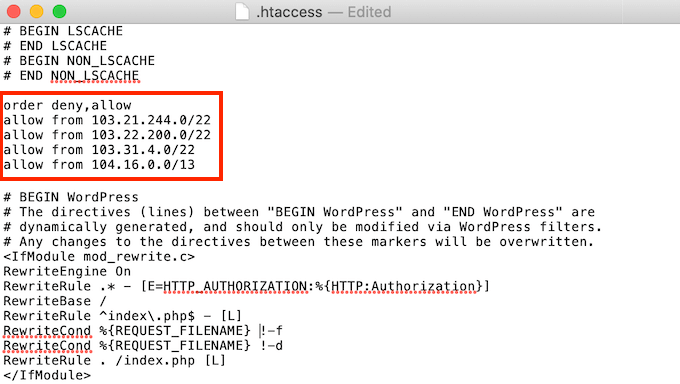
After adding all the Cloudflare IP addresses, save your changes. You can now close the .htaccess file.
Now you can go ahead and visit your site, to see whether this has fixed ‘Error 521.’
4. Ask Your Hosting Provider to Enable Port 443
Cloudflare offers a variety of encryption options.
Before encountering the 521 problem, did you go to Full or Full (Strict) mode? This might have been the source of the issue.
Cloudflare requires access to port 443, whether in Full or Full (Strict) mode. Some hosts, however, block Cloudflare from accessing this port, resulting in the ‘Message 521’ error.
Enable port 443 on your server as a solution.
This step will differ based on your hosting provider and the settings on your server. In light of this, we recommend contacting your hosting provider and requesting that port 443 be enabled for you.
5. Create and Upload a Cloudflare Origin Certificate
When utilising Cloudflare’s Full or Full (Strict) mode, you may still get the 521 error even if port 443 is enabled.
Because certain services may only accept connections on port 443 if you have a valid Cloudflare Origin Certificate, this is the case. The traffic between Cloudflare and your web server is encrypted with this certificate.
You may receive a ‘Error 521’ if you do not give an Origin Certificate.
The good news is that Cloudflare can take you step by step through the process of generating this certificate.
Log into your Cloudflare account to get started. Then select SSL/TLS » Origin Server from the drop-down menu.
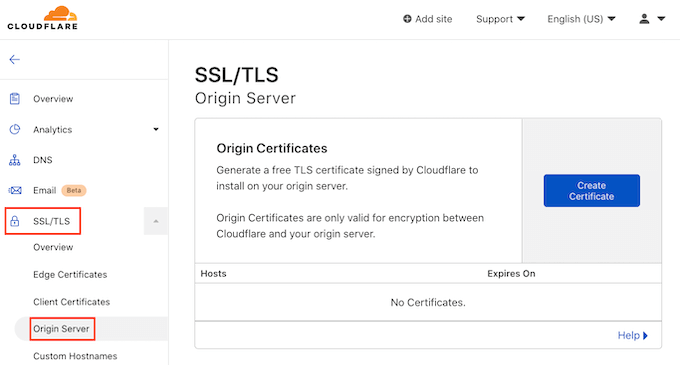
Next click on the Create Certificate button.
Cloudflare will now ask for a private key and a Certificate Signing Request (CSR).
Do you already have a private key and CSR? Then simply select the ‘Use my private key and CSR’ checkbox.
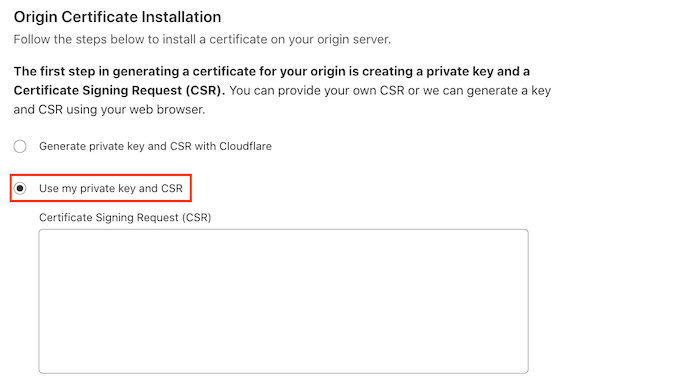
You can now type your CSR into the ‘Certificate Signing Request (CSR)’ box.
If you don’t have a CSR and key, don’t panic! Cloudflare can create these two things for you.
To get started, select ‘Generate private key and CSR with Cloudflare.’
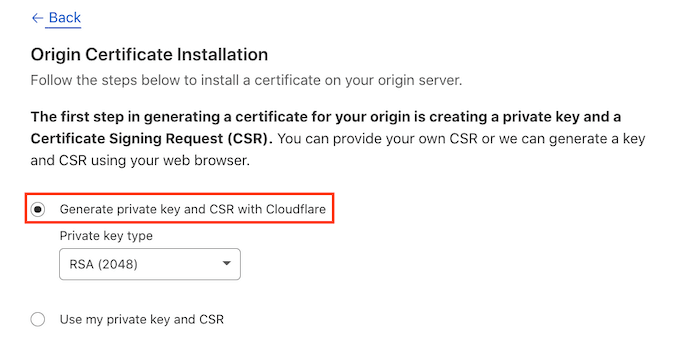
You now have the option of creating an RSA or an ECC key.
ECC and RSA are both considered equally safe by most security professionals. ECC, on the other hand, has a shorter key length. As a result, ECC keys are quicker.
As a result, we propose that you produce an ECC key.
Open the ‘Private key type’ menu once you’ve made your selection. Then you may choose between RSA and ECC.
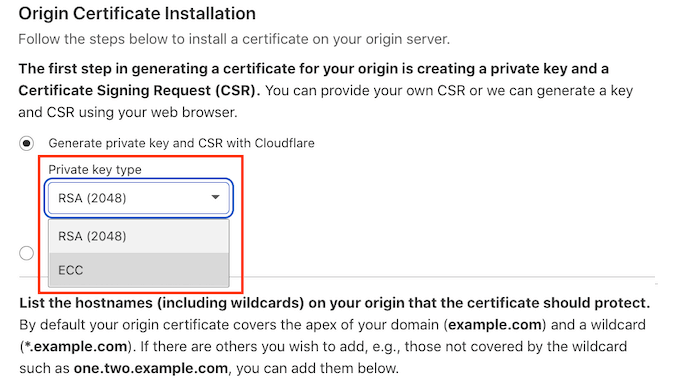
Scroll down to the Hostnames column. You can enter all of the hostnames that you want to protect in this box. Although it may appear difficult, Cloudflare takes care of a lot of the legwork for you.
Cloudflare has already added your root domain name, as you can see.
Cloudflare also adds a wildcard, which is the domain of your website plus the * sign. This is a ‘catch-all’ that ensures the security of your subdomains. If your root domain is www.example.com, for example, this wildcard will protect your’store.youurwebsite.com’ subdomain as well. See our entire guide to subdomains for additional information.
Most websites should be safe with these default settings. If you need to add additional hostnames, simply put them into the ‘Hostnames’ section.

Next scroll to the ‘Certificate validity’ section.
Your certificate will be valid for 15 years by default.
Need more time? Then just open the ‘Certificate validity’ dropdown and choose a new value.
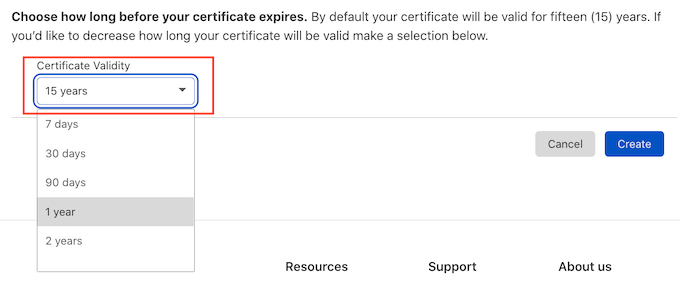
When you’re happy with all the information you’ve entered, click on the Create button.
Cloudflare will now create your certificate.

The Origin Certificate and Private Key will then be shown by Cloudflare. This information will need to be copied into separate files.
NOTE: After exiting this screen, you won’t be able to see the Private Key again. With that in mind, be careful to keep this key in a secure location.
Your Origin Certificate is now ready to be uploaded to your web server. Depending on your hosting provider and server, the stages may differ.
Cloudflare has prepared guidelines for the various types of web servers to assist you.
The final step is to update your SSL/TLS encryption mode once you’ve installed the Origin Certificate on your server.
Go to SSL/TLS on your Cloudflare dashboard.
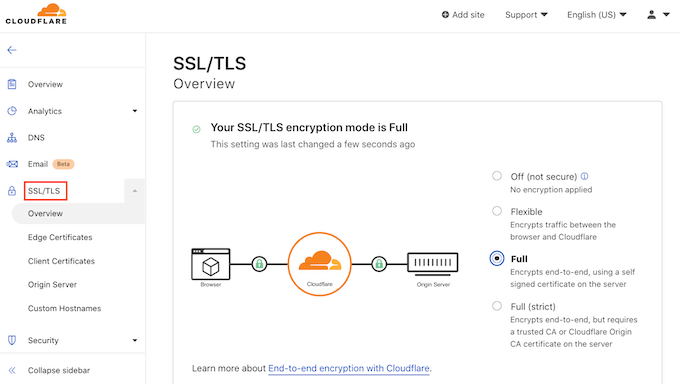
Now find the ‘SSL/TLS encryption mode’ section.
In this section select ‘Full (strict).’
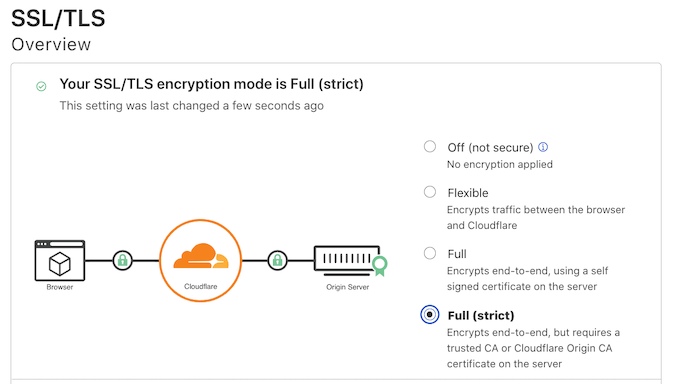
Cloudflare is now using your Origin Certificate. You can now check your site to see whether this has fixed the ‘Error 521’
We hope this post on how to repair ‘Error 521’ with WordPress and Cloudflare was helpful. If you’d want your hosting firm to handle the technical intricacies, check out our guide to the best managed WordPress hosting, or our roundup of the top business VoIP providers for small enterprises.

